Vest shaped card | Sunny Studio


Hi crafty friends! Today I am showing you a funny card with the Sweater Vest Dies and Breakfast Puns stamp set from Sunny Studio Stamps.


I started the card making with Die-cutting. I made the card front from blue Cardstock and ran it through the Cable Knit Embossing Folder. Next I made the other vest elements from mustard yellow cardstock and adhered them to the right place. 


The next step was stamping and coloring. I stamped the images with the Breakfast Puns stamp set and colored them with my Copic Markers. After the coloring I fussy cut them. 


I styled the colored images on the card, and made "the vest" words with Loopy Letter Dies from the same mustard cardstock. 


I added a white embossed sentiment to the center of my card and added some shiny and sparkly tiny stars and sequins


I really love the result, I hope you too. Thank you very much for reading through my post, I hope that you have enjoyed it and I have inspired you!


SUPPLIES


I prepared for you the list of products which I used for making this project. If you buy these through my links you help me running this blog. (You can find the affiliate disclosure here). Thank you for your support!


SAVE IT


My projects compressed into a photo :) If you like it, save it to your Pinterest board. Thank you!

Shaker Card | Save the Crafty YouTuber Video hop


Hi everyone! Today I am thrilled to announce that I am part of the Save the Crafty YouTuber video hop! YAAAAY! This hop was initiated by Justine Hovey, and it's about cardmaking video tutorials created by a group of talented crafters of all different styles and levels. We are coming together to give our viewers a chance to discover other amazing cardmakers. 
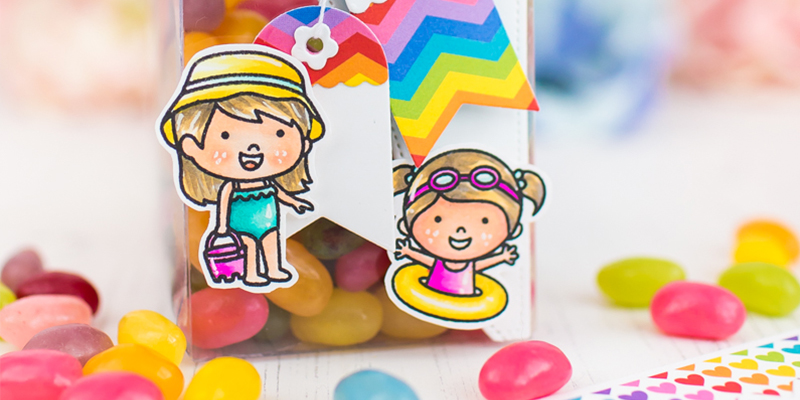
I created a super easy quick Lawn Fawn shaker card tutorial for you, I hope you will enjoy it. 


There will be prizes to be won at each stop in the hop, plus you will get the opportunity to discover new crafty channels.

All you have to do is watch, like the videos, consider subscribing and click the link in the video description to hop to the next video. So if you want to win you need to left a comment by the 5th of June. Prizes will be announced on the 10th of June on Justine’s channel and blog. You can find her links in the video description. In your comment you should mention that you are from the US or that you are an INTERNATIONAL. You DO NOT have to comment on every video in the hop but the more you comment, the more chances you have to win a prize.


VIDEO

And now let's see how I made this cute and easy Lawn Fawn shaker card and don't forget, if you want to win or you like my inspiration feel free to comment on my video. And if you hit the subscribe button I will be over the moon. :)


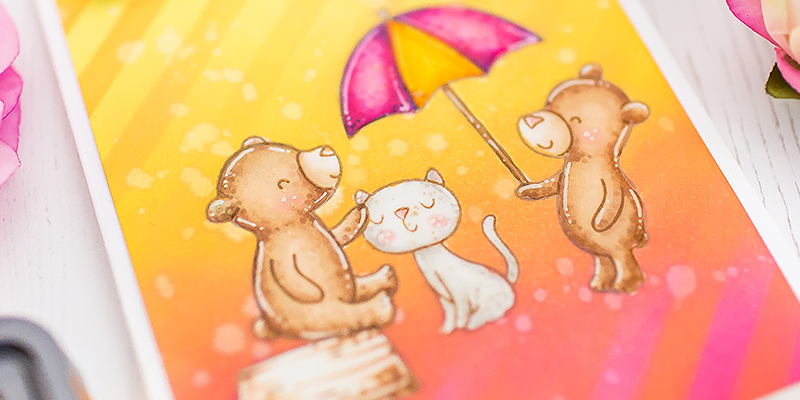
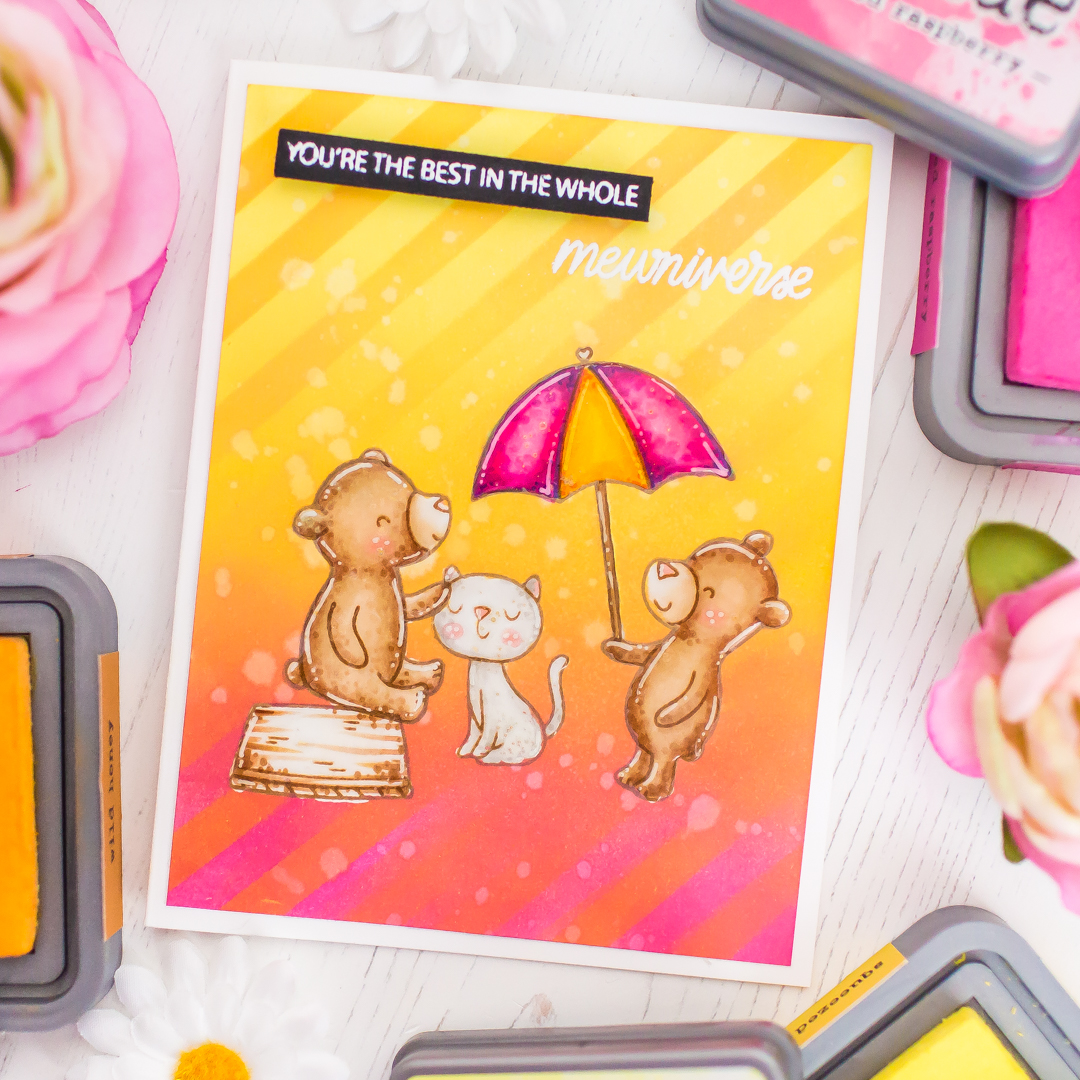
I am starting the cardmaking process with ink blending on a green cardstock with Peacock Feathers Distress Oxide Ink. Then I continue the blending process with Shaded Lilac Distress Oxide Ink on a die-cut, what I made with the How You Bean shaker Add-On from Lawn Fawn.


Next I started the coloring and I am going to use my copic markers. I started with Yellow Green and Green Markers. If you go through the coloring twice, you will get better results. If you want to skip the coloring process jump to the indicated time. 


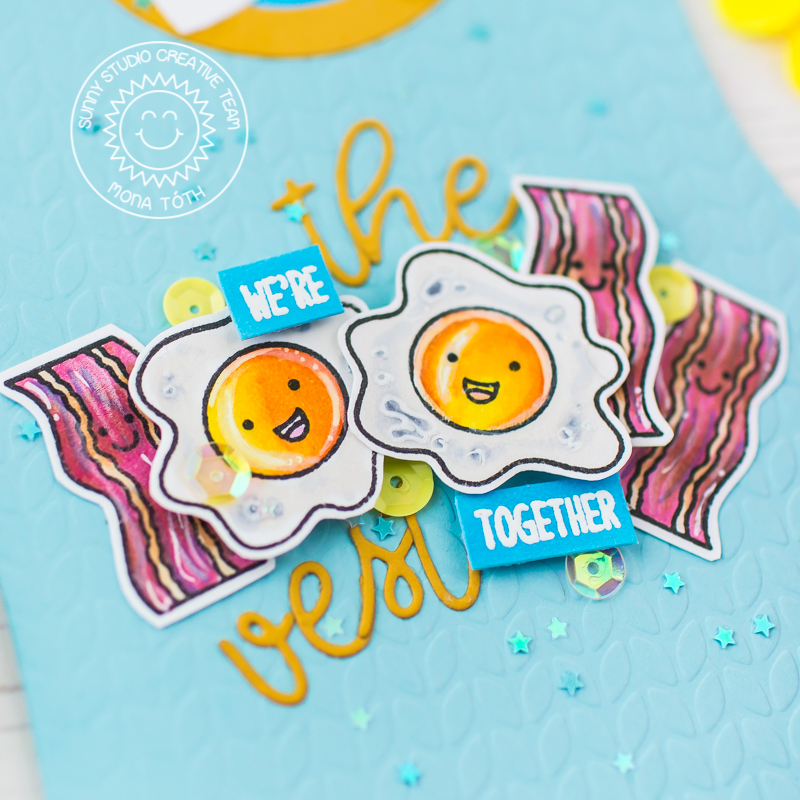
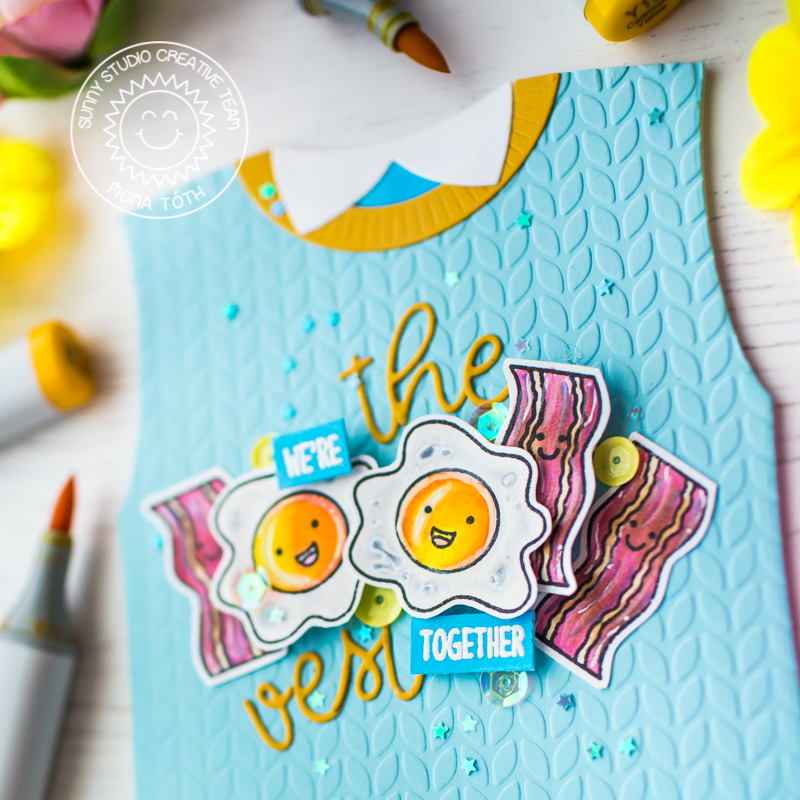
When it was done I put my card together, so I chose a patterned paper from the Really Rainbow and Spiffy Speckles paper packs. I used the stitched scalloped rectangle frames and the park shadowbox add on dies from lawn fawn. And finally my Lawn Fawn shaker card was ready.


Your next stop in the video hop is Lindsey Adreon's video. Remember that the more videos you watch and comment, the higher your chance to win! If you get lost along the way or if you want even more information on the hop, you can visit Justine’s website.


Thank you very much for reading through my post, I hope that you have enjoyed my video and I have inspired you! I wish you happy video hopping and good luck. 
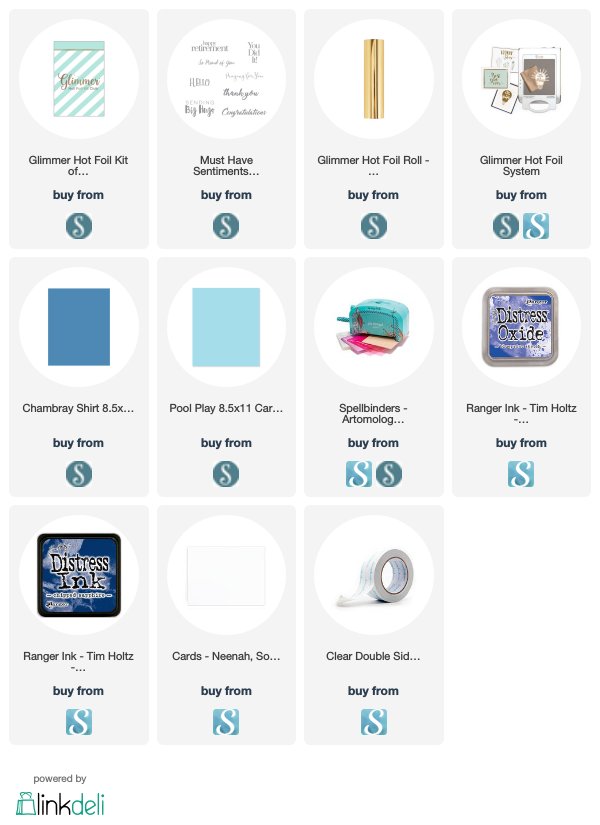
SUPPLIES


I prepared for you the list of products which I used for making this project. If you buy these through my links you help me running this blog. (You can find the affiliate disclosure here). Thank you for your support!

SAVE IT


My projects compressed into a photo :) If you like it, save it to your Pinterest board. Thank you!


Underwater interactive card | Sunny Studio Stamps


Hi crafty friends! Today I am showing you a funny card with the Coastal Cuties and Best Fishes stamp sets from Sunny Studio Stamps.


I started the card making with ink blending. I blended the blue "underwater" cardstock from the Summer Splash Paper Pad with Salty Ocean and Blueprint Sketch Distress Oxide Inks, then I splattered on it with white, blue and dark blue watercolor. I repeated this process on a blue and brown cardstock too.


When it was dry I adhered it to the card base, then ran through my die-cut machine with the stitched window die from the Wrap Around the Box die-set. Next I created the sand with the Woodland Border Dies and dotted brown paper. When it was done I stamped the sentiments with Watermark Ink and heat embossed with White Embossing Powder. I adhered the blue splattered cardstock to the inside of my card.


The next step was the stamping and coloring. I stamped the images with the Coastal Cuties, Best Fishes and Magical Mermaids stamp sets and colored them with my Copic Markers. After the coloring I ran them through the Die-cut machine with the coordinating dies.


In the end I styled my card and added a cute shark to the center on an Action Mini Wobbles and my card was ready.


Thank you very much for reading through my post, I hope that you have enjoyed it and I have inspired you! If you want to see how my card works, check my Instagram for the video. :)

SUPPLIES


I prepared for you the list of products which I used for making this project. If you buy these through my links you help me running this blog. (You can find the affiliate disclosure here). Thank you for your support!


SAVE IT


My projects compressed into a photo :) If you like it, save it to your Pinterest board. Thank you!


May Small die of the month | Spellbinders


Hello crafters, today I am going to show you my newest project with the May Small Die of the Month kit from Spellbinders


I started the cardmaking with Die-cutting. I played with my favorite color combo, I used yellow, pink and blue cardstock and added a little neutrals too. Next I made the card base from Neenah Solar White Cardstock. Its size is 5.5 x 4.25 inches. 


I created a stripy background with the Love Stripes Embossing folder and splattered with dark blue and white watercolor. 


I let it dry until I adhered together all the Die-cut pieces. When it was done I styled and put my card together. YAAY! My enjoy the ride card is done. 


Thank you very much for reading through my post, I hope that you have enjoyed it and I have inspired you! If you like my creations let's be friends on Instagram. :) 

SUPPLIES 


I prepared for you the list of products which I used for making this project. If you buy these through my links you help me running this blog. (You can find the affiliate disclosure here). Thank you for your support! 


SAVE IT 


My projects compressed into a photo :) If you like it, save it to your Pinterest board. Thank you!


Candy Box | Sunny Studio Stamps


Hi crafty friends! Today I am showing you a clear box filled with yummy jelly beans. For this project I used the new Wrap Around Box die from Sunny Studio Stamps.


I started the card making with die-cutting. I run the largest die from the Wrap Around Box set through my Die-cut machine and made four pieces of acetate die-cuts and adhered them together with double sided adhesive.


Next, I made four circles from the Colorful Surprise cardstock and four parts from white cardstock to the top and styled my box. I also made sweet and cute tiny tags with the die-set.
In the end I stamped and colored sweet figures from the Coastal Cuties stamp set and my candy box was ready.


Thank you very much for reading through my post, I hope that you have enjoyed it and I have inspired you! If you like my creations let's be friends on Instagram. :)

SUPPLIES


I prepared for you the list of products which I used for making this project. If you buy these through my links you help me running this blog. (You can find the affiliate disclosure here). Thank you for your support!


SAVE IT


My projects compressed into a photo :) If you like it, save it to your Pinterest board. Thank you!

Spellbinders | Glimmer of the month May


Hello crafty friends, I hope your weekend is going well! Today I am going to show you my newest project with the May Glimmer of the Month kit from Spellbinders.


First, I created my card fronts with Chambray Shirt and Pool Play papers. Their size are 5.5 x 4.25 inches. Next I made an ink blending with Blueprint Sketch and Chipped Sapphire Distress Oxide Inks.


When it was done I made the Hot-foiling with my Glimmer Hot Foil Machine. Look how easy is to make a quick and beautiful elegant card with this set. As always you can find one roll of hot foil in the kit. This time it is the beautiful Polished Brass Foil Roll. This color matches perfectly with this beautiful blue paper!


In the end I die-cut the center of my card with the coordinating die and added a heat embossed sentiment from the Must Have Sentiments stamp set, added some embellishments and it was ready. Thank you very much for reading through my post, I hope that you have enjoyed it and I have inspired you! If you like my creations let's be friends on Instagram. :)

PHOTOGRAPHY TIPS FOR CARDMAKERS

Did you know that I am sharing photography tips frequently on my Instagram stories? The topic for today is how to shoot shiny things! Click to the picture and search for the "photography" highlight on my feed.

SUPPLIES


I prepared for you the list of products which I used for making this project. If you buy these through my links you help me running this blog. (You can find the affiliate disclosure here). Thank you for your support!

SAVE IT


My projects compressed into a photo :) If you like it, save it to your Pinterest board. Thank you!


Video Colab | Giveaway Winner


Winner winner chicken dinner! We had a giveaway with Laura on our channels, for our video colaboration and we have the winner! YAAY!

If you missed the video be sure to check it out, I am sharing with you a nice masking technique with Heffy Doodle products.


Speaking of Heffy Doodle, they were super kind and decided to sponsor a giveaway on our channel, and here is a look at the yummy prize pack they offered! Thank you thank you Lesley! :)


The randomly drawn winner of the giveaway is Sew Sleepless!

Big congrats with crafty hugs Sew Sleepless! To redeem your prize, please email me (craftbymona@gmail.com) or Laura before Sunday May 18th.


Thank you so much to those who entered, and many thanks to Heffy Doodle for being a sponsor!