Showing posts with label craftroom. Show all posts

10 Things Every Crafter Should Know About Catherine Pooler Inks

I was planning to write this post since forever, when I had an opportunity to try the Catherine Pooler Ink Pads according to the Winter Trio Hop which was a really great hop between three amazing brands, but I wanted to test them longer. 


I am not going to lie, I never understood the hype around these ink pads, but when I received them in November, I fell in love with them, and I needed to order some colors immediately! I can tell you, I was the happiest girl ever when they sent me the new Ink Pads! Why? Read the details below. 


THIS POST FEATURES

• For the additional supplies visit the thumbnails below this post or click here for the visual supply list. 

Catherine_Pooler_Inkpads
Do you enjoy this post? I really appreciate if you pin this photo to your Pinterest.


When I received the new Date Night Ink Pad Collection, I thought it’s a perfect time to swatch them, and write a post about them. You need to know, I am writing this post, because I am really obsessed with Catherine Pooler Ink Pads. I received the Date Night Ink Pad Collection as a gift, but no one asked me to create this post. 


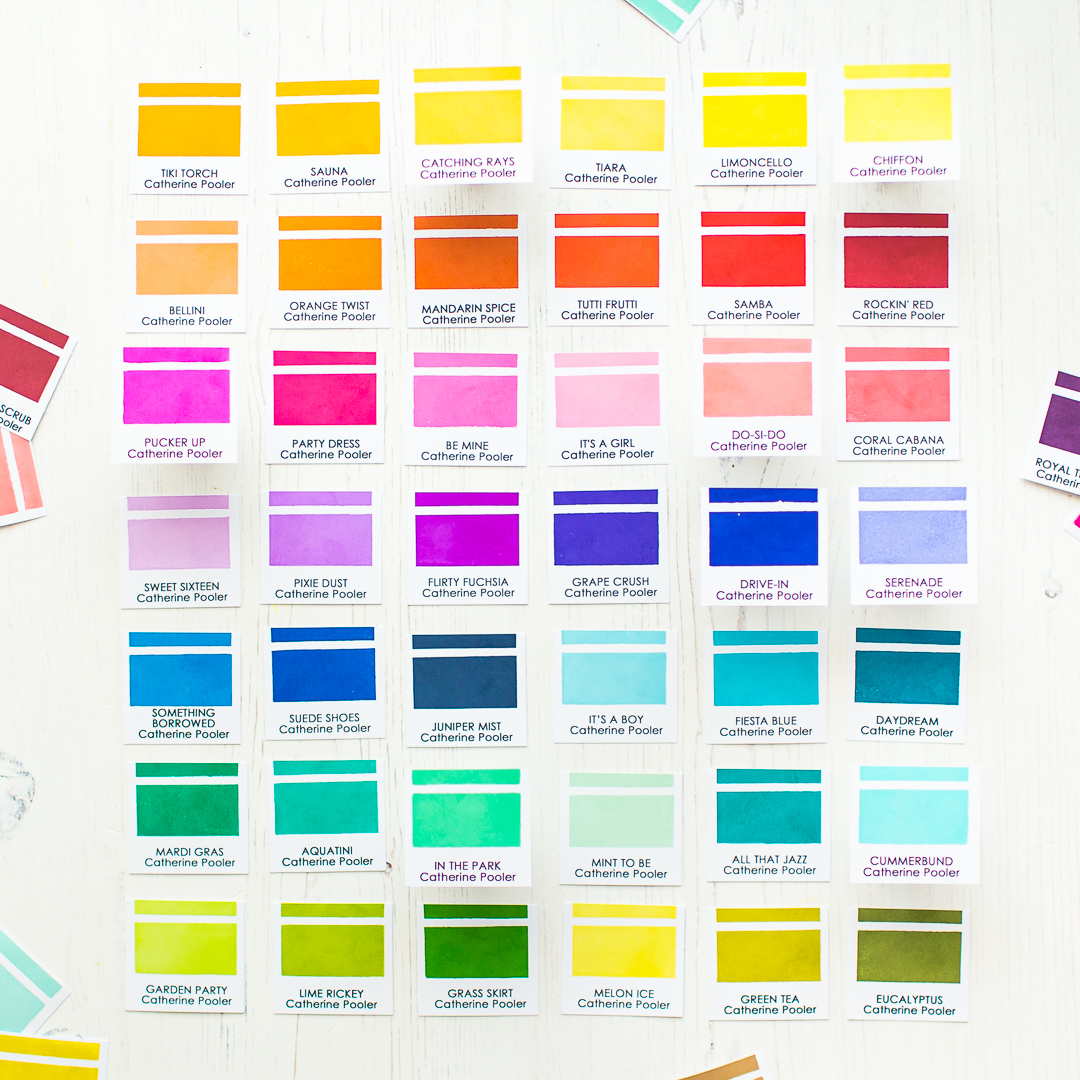
Now Catherine Pooler INKS have their FREE own swatch printable, what I will use in the future too because it's very cute and useful (you can find it here). But when I created this post, for the swatching I have used the editable ink swatch template from Jennifer McGuire, edited with the names of inkpads then printed out to heavy weight cardstock. In the end I swatched my inkpads with the Color Swatches for Ink Pads Stamp set. Now let’s jump to the mentioned tips. 


PERFECT FOR STAMPING 

Okay, everybody knows that, the inkpads are for stamping, so why I am wasting your time here with this tip? Of course, the inkpads are for stamping, but I want to mention, that these inkpads have really high quality, smooth foam pads and they are super juicy. 


You barely have to touch the inkpads with your stamps which means, one or maximally two taps with Catherine Pooler Ink Pads are enough to cover your image perfectly and you are ready to stamp. It transfers perfectly and the result is a beautifully smooth finish


You don’t need to repeat the stamping process for the same image, because the stamping result will be solid and smooth from one stamping which is priceless and time saving as well. 


I am in love with the beautiful Cummerbund color I have used on this card. For me this is the perfect light turquoise color, and I can’t get enough of it! For more details of this card visit my Instagram post here.


USE THEM AS WATERCOLORS 

The Catherine Pooler Ink Pads are a perfect choice for your favorite water coloring techniques like various watercolor washes as well as wet-on-wet or wet-on-dry techniques. I am planning to order in the future their re-inkers and use them as watercolors too. 


I have created this simple and easy card with the new Date Night Ink Pad Collection where I have used them as watercolors. In the background you can see watercolor stripes from three shades only. 


I have used Cummerbund, Pucker Up and Chiffon colors. I painted with Cummerbund first and after a quick heat set continued with the other colors too. 


I just overlapped the colors and the result is this bright rainbow striped background. 


THEY ARE GOOD FOR STAMP LAYERING 

If you check the full inkpad collection, you will notice that, the colors are coordinated perfectly. You will find many inkpads in matching tones and saturations. After the stamping you will need to wait a few seconds until it dries. The totally dried image will be as light as the lid, but I will talk about this later in this post. 


IT’S A COLORFUL WATERMAKR INK 

If you have clear embossing powder in your stash, then I suggest you to try your Catherine Pooler Ink Pads as a colorful watermark ink. 


These inkpads do not dry immediately, so you will have a few seconds to add embossing powder to the top of it. Then just continue your heat embossing process. It’s so cool especially for the sentiments! 💙 


YOU CAN USE THEM FOR INKBLENDING 

When the background was dry on my previous card, I made an ink blending with the Catching Rays Ink Pad behind the sentiment, to pop it out more. 


So YASSS! The Catherine Pooler Ink Pads are perfect for smooth ink blending too and it looks really nice, when you are combining two techniques on one card.


OTHER FANCY TECHNIQUES

Beside the above-mentioned techniques, you can use these inkpads for many trendy cardmaking techniques like the Stamp Kissing, Ink splattering, distressing with water and many more. You can mix the colors with white watercolor to make it more pastel for water coloring, or mix it with white gouache to have opaque colorful splatter in any color. 


This is another example above. Here I have created the background with Flirty Fuchsia and Aquatini from the Life of The Party Mini Set. (For the houses I have used the same set.) Then splattered with various watercolor mixes. The result is a bright and smooth blend with cool splatters. Read more about this winter card here.

THERE ARE NO MORE COLOR TRANSFER PROBLEMS 

The stampers biggest nightmare is to stamp after a vibrant dark color a lighter one to get the wanted light shade. Or drop the acrylic block to the finished stamping LOL Unfortunately the Catherine Pooler Ink Pads will not levitate your stamping blocks, but you can feel totally safe, stamping a lighter color after a vibrant ink color. 


Just make sure to clean your stamp before the next color. I am cleaning mine with stamp shammy, then I am stamping a few times on a scratch paper before inking it again. 

FREE COLOR WHEEL

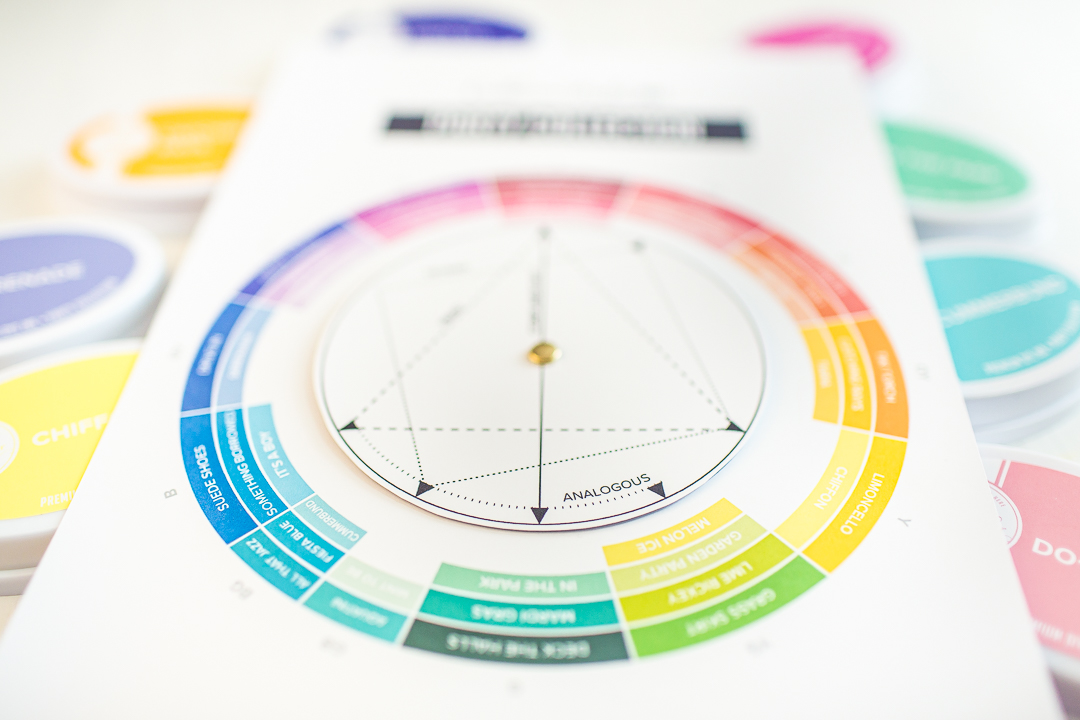
I was super excited when I saw, that they created a new Color Wheel for their inkpads, which you can download FOR FREE! Version 1 | Updated version 2 with the new ink colors.
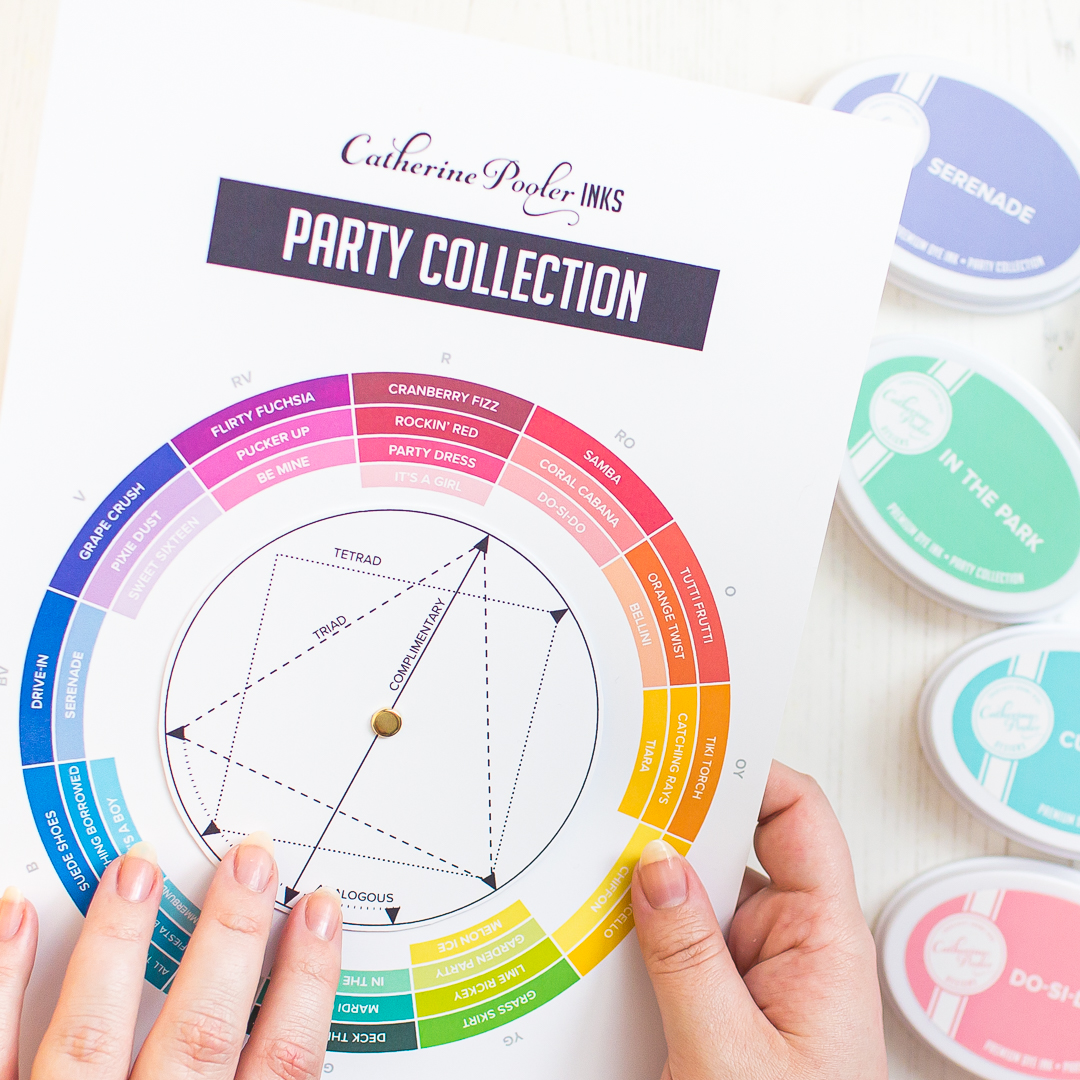

I always wanted to have a color wheel and now I have more, because it totally coordinates with the inkpads I love, and I don’t need to think about what colors to choose. Be sure to follow their blogpost to learn how useful it is for creating your own color combos. And they have a color theory to the post with video tutorial too. 

IT HAS WIDE RANGE OF COLORS

They separate their inkpads in two categories, by the colors. In the Party Collection you will find fully saturated colors, which means they are happy, bright and vibrant colors. In the shop you can see them in rainbow order which is really inspirational. 


In the Spa Collection you will find low saturated, soothing colors, kind of muted and greyed down colors which are really trendy now and, on the cards, they just look amazing. 

INNOVATIVE DESIGN

Last but not the least, let me talk about their inkpad design. First of all, I really love that they are white, and on the top of the lids you can see the inkpad color. In 2021 Catherine Pooler Designs Updated their Ink Pad Labels. They did this because they wanted to have a more accurate representation of their ink colors. 


This means, that the top of the inkpad, will match with your stamped image once it has dried. Soo fantastic right? They made it available for their existing customers for an affordable price, if they want to fresh up their already owned inkpad lids. If you don’t own Catherine Pooler Ink Pads yet, then you will receive automatically the upgraded inkpad lid. 

VIDEO TUTORIAL

** Update 1/9/22: I have swatched all my Catherine Pooler Inkpads with some really useful stuff what they released in a video tutorial. Watch the video here or below. 
  

Thank you so much for joining me today, I hope you found this post useful. I really like the Catherine Pooler Ink Pads, they are amazing! Please let me know in your comment what are you thinking about this brand. If you want to read more about their ink pads, feel free to check their All About Inks post. See you next time, Mona. 

USED SUPPLIES

Using affiliate links does not mean additional costs for you. I really appreciate your support. I am using only products I LOVE. If you buy supplies through my affiliate links, you support my channel and blog with a small commission and when you shop through my links, I will do a happy dance. Affiliate Disclaimer.
I found the best word die storage | Memorydex Rolodex Spinner

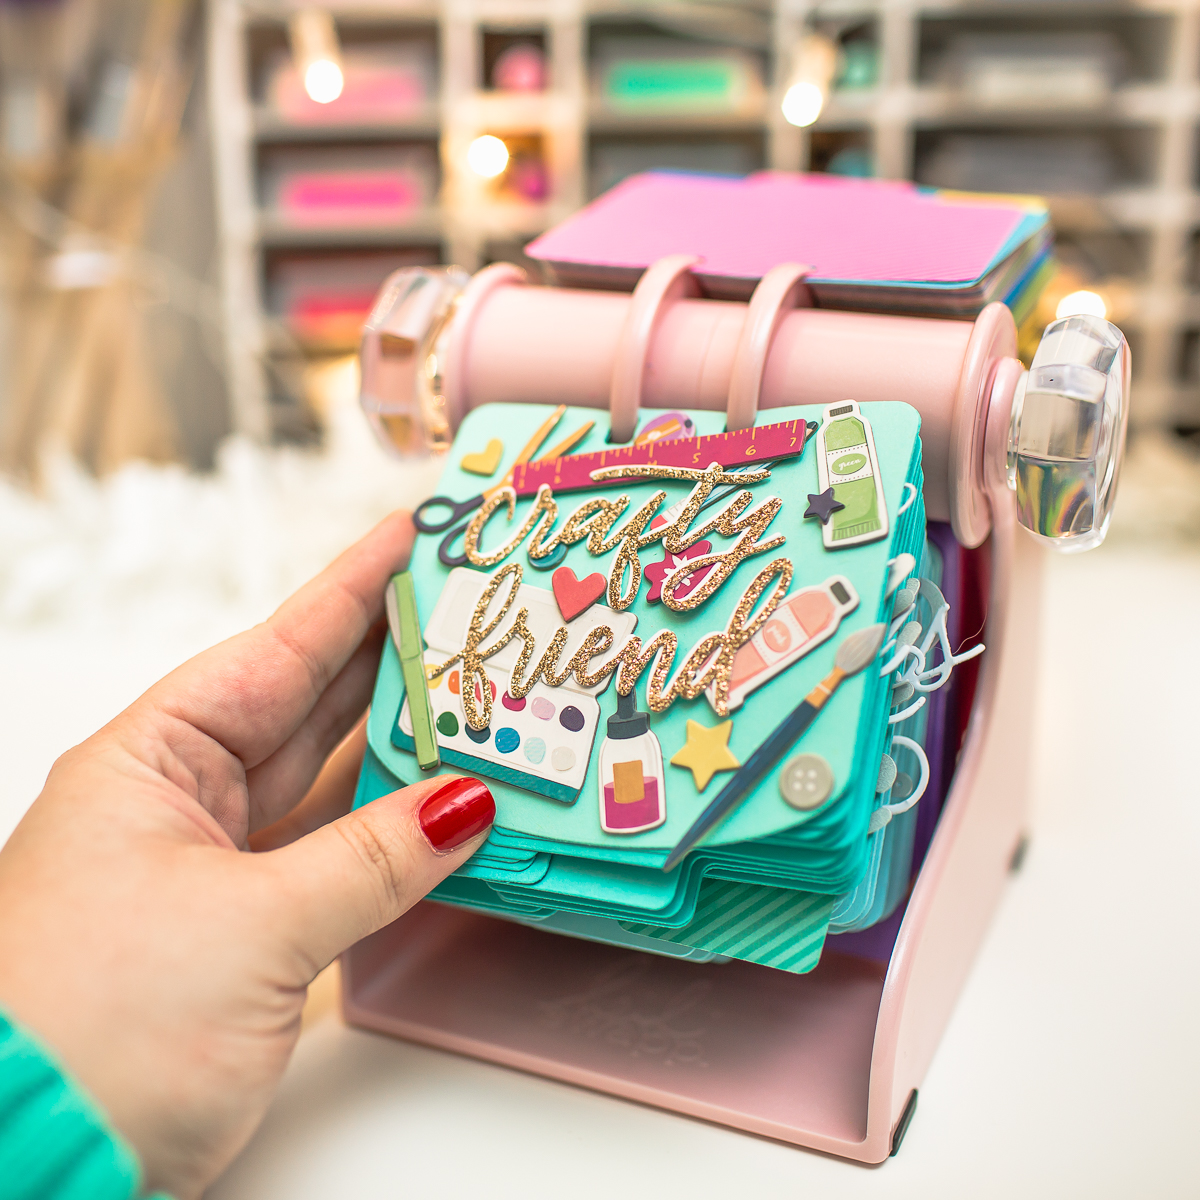
I was searching for a good solution to store my word dies since forever and now I feel that I have finally found it!

This beautiful tabletop Rolodex Spinner was created originally for memory keeping, but when I saw it, I fell in love with it, and I knew that I want it, and I will use it as a crafty assistant on my desk. 


I filled it with my dies and had soo much fun with it. In case if you want to check my video, you can find it here.


I created colorful cards from heavyweight cardstock in rainbow order, and turned it to my word die organizer. So, I got the Memory dies for myself and I created lots of colorful cards. Next, I created labels with the names of die-cut-s, so any time I am using a metal die I will know, what is its name and which brand it is. 


After I adhered the die-cuts to their right place, I added the printed label, then I turned the card, and adhered on it a smaller piece of magnet what I cut from leftover magnets. I can tell you I am in love with this blush amazingness. Heidi, thank you so so much for this product!  I really love it! 

VIDEO TUTORIAL

I am sharing with you all the process in my video, be sure to check it out! I was searching for a good solution to store my word dies since forever. I feel that I finally found the best word die storage, be sure to check it out how. Clickable tutorial link


SALES


It's the Scrapbook.com PRE-BLACK FRIDAY SALE! Now until November 23rd, join us as All American Crafts Brands are ON SALE and All Scrapbook.com Branded-Items are at their lowest prices! Check out the free Holiday Gift Guide and freebies, too!


Thank you so much for stopping by, if you like organizing posts be sure to check out my Craftroom tips what every crafter should know post too. Have an amazing day, see you next time. Mona

USED SUPPLIES


I am using products only I LOVE. If you buy supplies through my affiliate links, you support my channel and blog with a small commission and when you shop through my links I will do a happy dance. Using affiliate links does not mean additional cost for you. I really appreciate your support. Affiliate Disclaimer.


PIN IT

My projects compressed into a photo :) If you like it, save it to your Pinterest board. Thank you!


Craftroom tips what every crafter should know


Do you know the feeling, when you are in a hurry with a project, when you have to post in a few hours, but you can’t find the Die-cut what you just held in your hand? Where can it be? You just put it here, but it’s not there and you are super nervous. If you don’t know what I am talking about, then all my respect is yours! When I am not organizing my projects, I am doing this activity and I can be really close to a Hulk transformation. 😂


Now, if you are still reading, I congratulate you, here comes the essence. I will show you some tricks on how I organize my projects and with this, the process of crafting will be a more joyful process. As always you can find the used supplies bellow my post. The first and most important thing in cardmaking is the white cardstock. A cardbase and cardfront is every time needed


If you prepare the bases and fronts in advance, you can save a lot of time or the most time saving tip is to buy them precut. Honestly it is not a 5 min project, but it will save you time for other things (trust me loooots of time). 


I mostly use Neenah Solar White cardstock because I love it! I use it for my coloring and its super useful that it is available in an already cut 5.5” x 4.25” size. In this case I just have to order in time before I use all of them. 


I am extremely happy that the colorful precut 5.5" x 4.25"card bases are available too, and I can use them not only as bases, but for die-cutting too. 


I buy and use the scored card base the same way so I just have to fold it in half and my base is ready. I mostly use horizontal but I have some vertical ones too. 


Two times in a year I cut my favorite papers and cardstock to 5.5” x 4.25” and organize them into my storage box. I put them on my crafty desk as close as I can. 


I made laminated dividers for better transparency. I printed the name of the paper on a colored copy paper, rounded the edges with corner chomper, laminated the whole and cut to size. 


If you don’t have time for making dividers, then check out white dividers. You just have to cut to size from the bottom and put the name of the cardstock on a vinyl sticker. 


I love this method, because when I look at the box, I instantly know which one I need and also, I can track their number so I know when to shop them. The point is there are at your fingertips. I use the Storage Bin with Lid, because it fits perfectly in my ALEX (Ikea) drawer, so when I need one cardstock, I just open the drawer and pull one out. 


Now that cardstocks are OK, let’s have a little preparation. The steps are really easy. For example, you want to create 4 projects until the end of the day. You plan all the projects and make sketches for each one. This way you will know which products you want to use. I prefer the stamping -> die-cutting -> heat embossing combo. 


When I am making more projects at once, I use Thicker Storage Solutions by Stampendous. I love it because it can hold the 8.5” x 11” cardstock, the inkpad, stencil and the prepared die-cuts and stamped images, almost everything what I need for the project. If I make it only tomorrow or the next week, then I write the project’s name on a sticky notes, stick it to the box’s side so I immediately know what’s inside. 


There are near future projects which are urgent but not instantly. For these I prepare the stamped die-cut images and I know which word dies I am going to use


I put all of these to a transparent envelope and I write to a masking tape the content and date of project. Later I can use the masking tape for die-cutting. This plastic envelope is made from sturdy plastic so even a Metal Die can’t harm it. It can be re-used lots of times. I have them at home in various sizes


If I need to create lots of projects then I put the Clear Craft Storage Box with 6 Tabbed Dividers to my desk and I put the projects into it in order. I know, this sounds a little too much for organizing, but I have a main job beside crafting so I would be lost without this level of organization. 


Sometimes I just feel I want to color, not having a project in mind. Then I just stamp and die cut for example cute critters from Lawn Fawn and I put them into clear containers which are transparent and easy to use. I can organize them separately so I can avoid mixing them. 


Also, in this way I will actually use all of them. Before I started using these containers, I just made them but somehow forgot about coloring and using them on cards. I heard that others have this problem too! 


So, if you want to improve in this field, try it out! What I extremely love, that you need to gently twist the lid when you open it, so the contents are not spilling out. There are two sizes I have the larger one and this is the smaller one available together with the clear box so you can stack them.


If you are ready with your project put all the supplies back to their places, so you will know where to look for them and you will avoid the unnecessary search for them. 


In the end I just want to share with you how I store my 6”x6” and 6”x8” stencils. It’s super simple, but I just LOVE it! I am using a 6x8 ring album for it, and 6x8” Open Page Protectors. These page protectors are perfect quality, and I can put back my scencils tons of times. 


For my 6x8 Exclusive stencils I put the back sleeves from the original packaging to the page protectors, because there is the printed name, but for the other stencils I print out the brand and the name of the Stencil to a colored copy paper. 


To one-page protector I put 2 stencils so I save space too. As you can see my album is full, so I will order this beautiful pink album soon for my new stencils. 


I hope you found this post helpful, in the near future I will have some different Quick Craftroom Tips. If you don’t want to miss it, subscribe to my newsletter. Please, write in your comment what is a topic which you would like to read about! Thanks for stopping by, big crafty hugs, Mona

USED SUPPLIES

I am using products only I LOVE. If you buy supplies through my affiliate links, you support my channel and blog with a small commission and when you shop through my links I will do a happy dance. Using affiliate links does not mean additional cost for you. I really appreciate your support. Affiliate Disclaimer here.


PIN IT

I you like this post, please pin it to your pinterest board to share with your crafty friends! Thank you so much, I really appreciate it! :)