Heart Valentine Card with Pretty Pink Posh


Hello crafty friend! This is the last day of the month and the last day of the Valentine Theme Week Sale at Pretty Pink Posh. They have tons of cute things in their shop, so jump over there and check out their products in the Valentine Section 15% off by the end of 31th of January. Thank you so much for supporting small businesses like Pretty Pink Posh.

THIS POST FEATURES

• For the additional supplies visit the thumbnails below this post or click here for the visual supply list. 

Do you enjoy this post? I really appreciate if you pin this photo to your Pinterest.

CARD INSPIRATION 

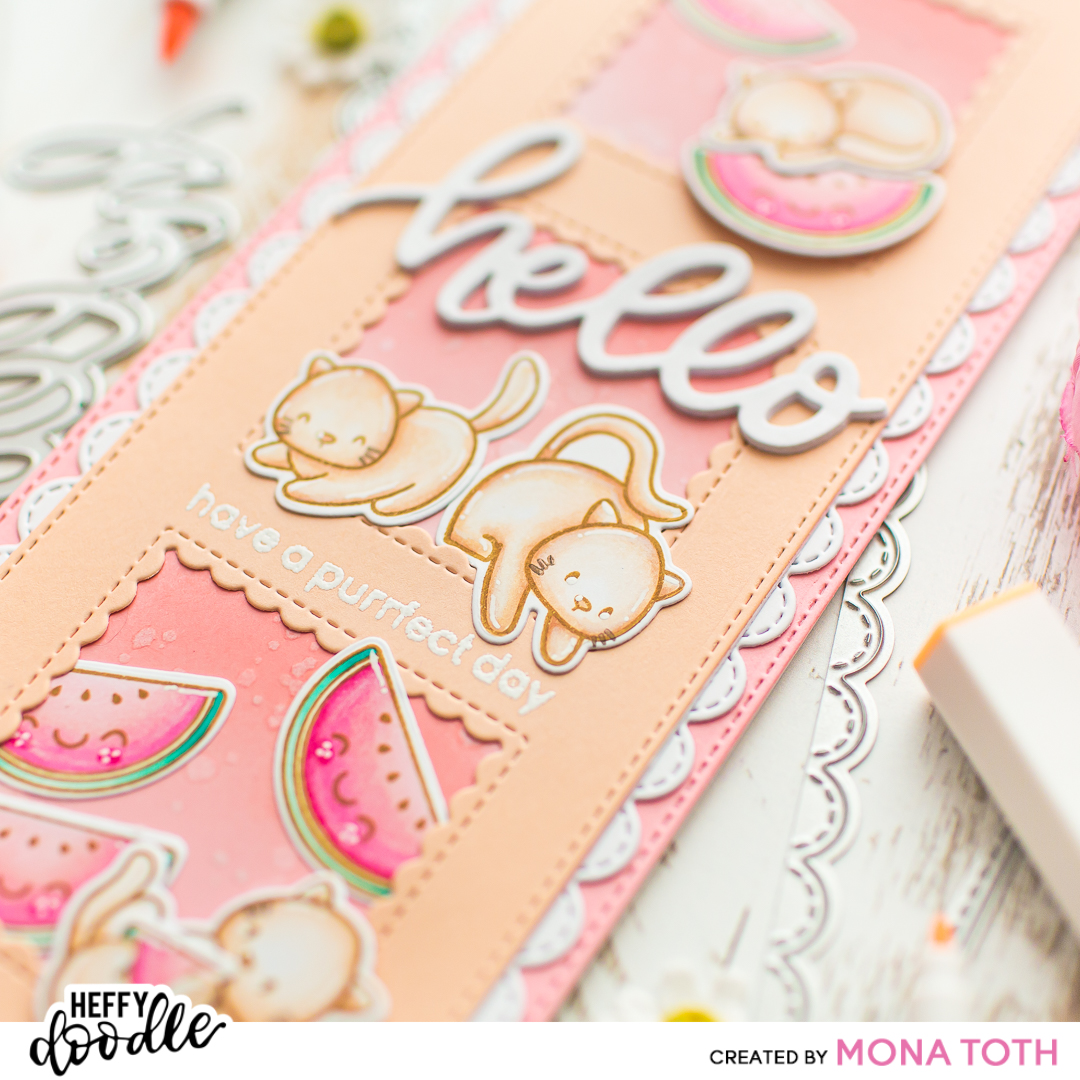
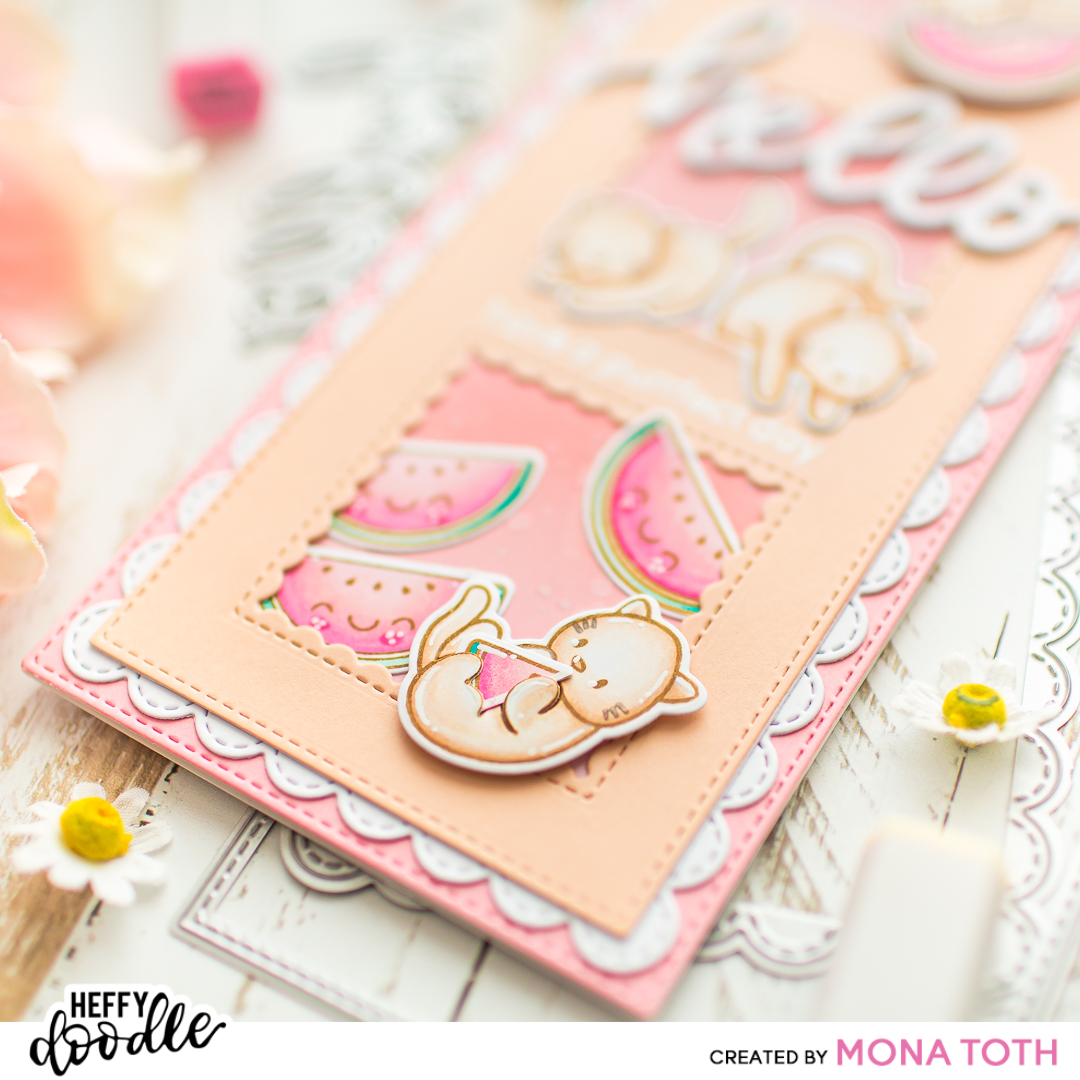
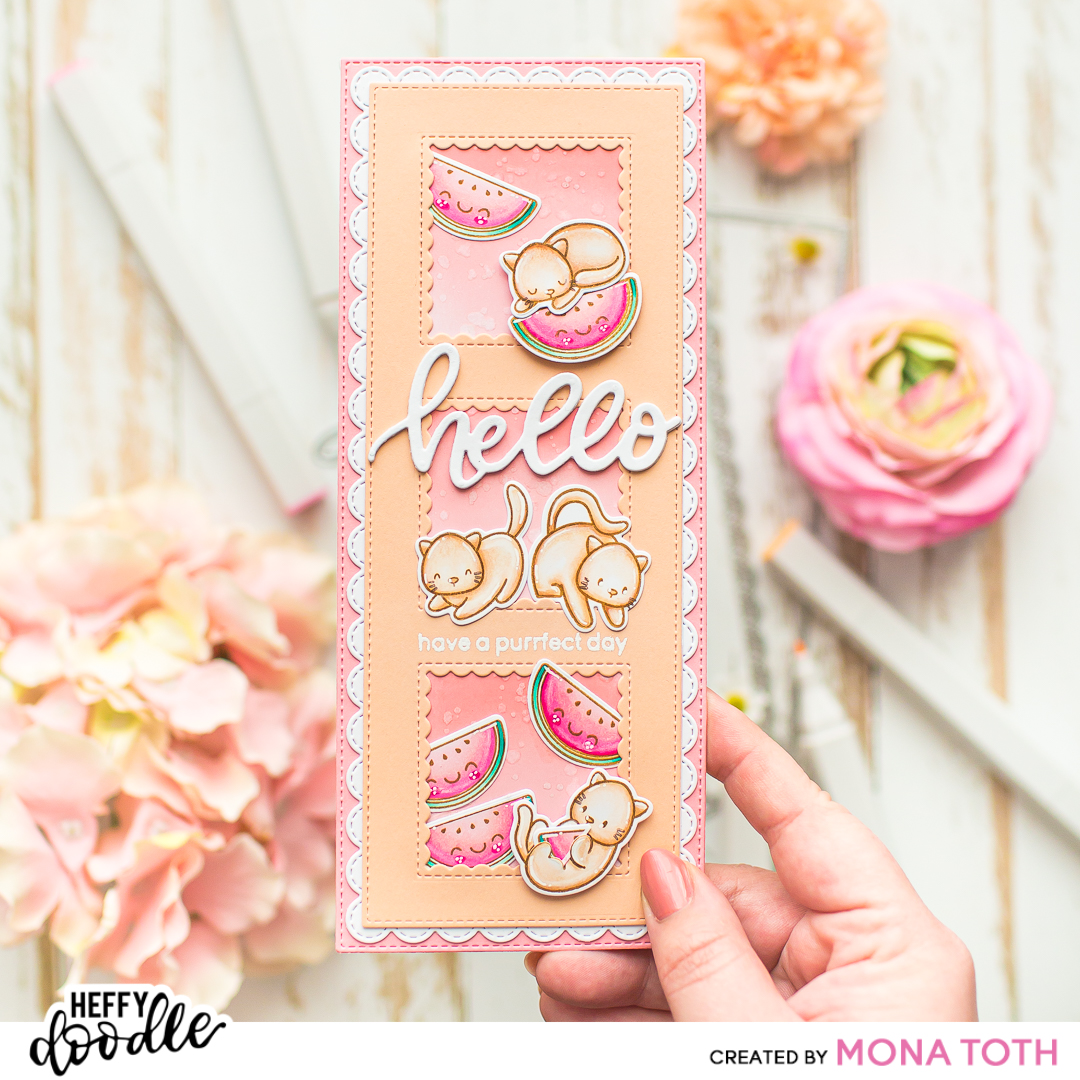
I started the cardmaking with stamping. I created the background with the beautiful Love script sentiment from the Valentine Hearts Stamp Set. I just stamped it multiple times. Next, I stamped the heart images from the Valentine Hearts stamp set with brown and dark pink alcohol marker friendly inkpads to create a fun look on the card.

Love this beautiful stamp set, so versatile and not only for Valentine's Day.

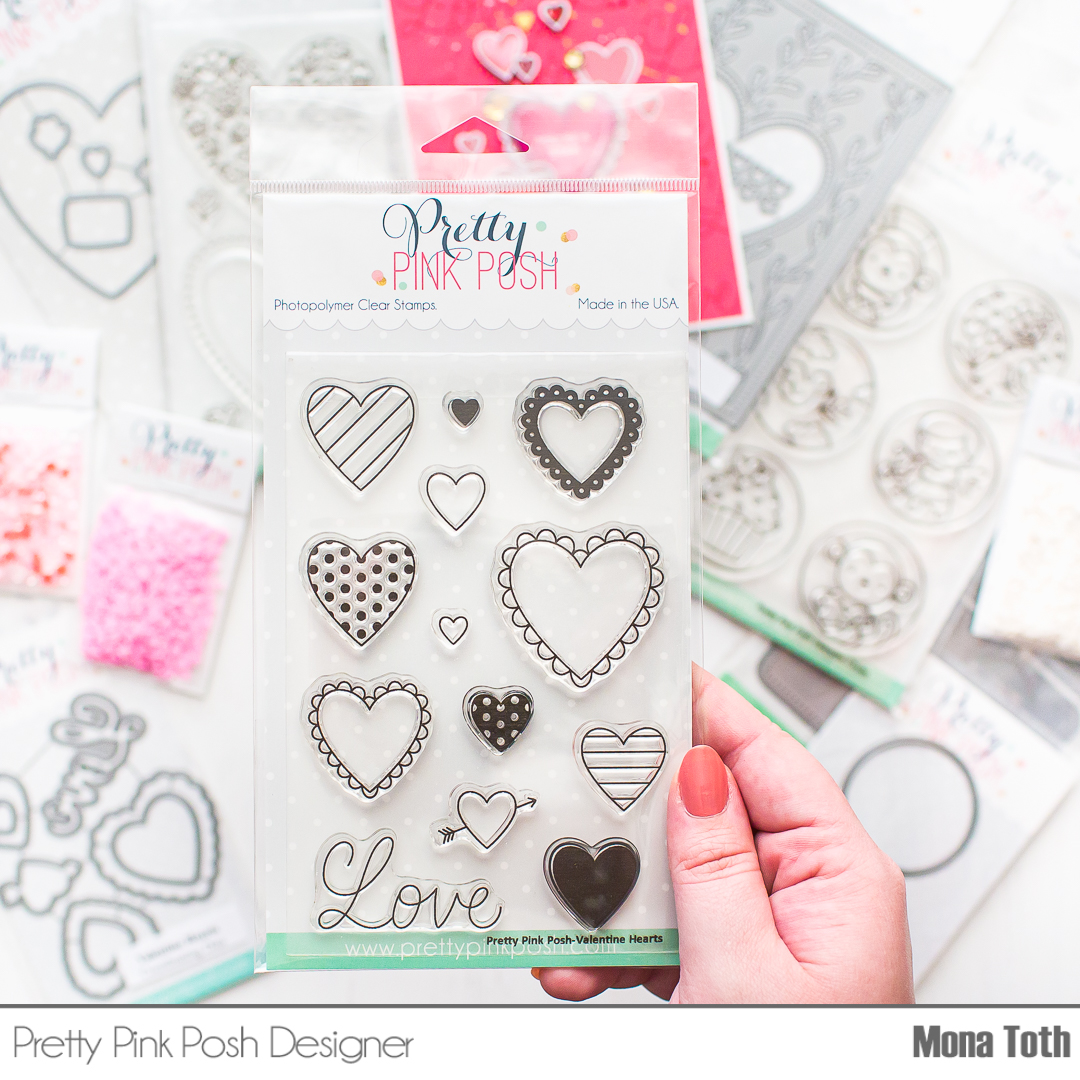
I continued with the coloring. After a quick heat set I colored them with Spectrum Noir Illustrator Markers, where I have used the following colors: FS1, AP2, AP3, AP4, CR7, CR9, CR11, DR7, MG2, MG3, MG4, BP6, BG3, BG1, Blender. When it was done, I run them through my die-cut machine with the Valentine Hearts Coordinating Dies.

Next, I created the background with this beautiful Love script stamp from the Valentine Hearts Stamp Set. I just stamped it with dark red inkpad to a rich pink cardstock. I splattered on it with white, red and gold watercolors to break the background.

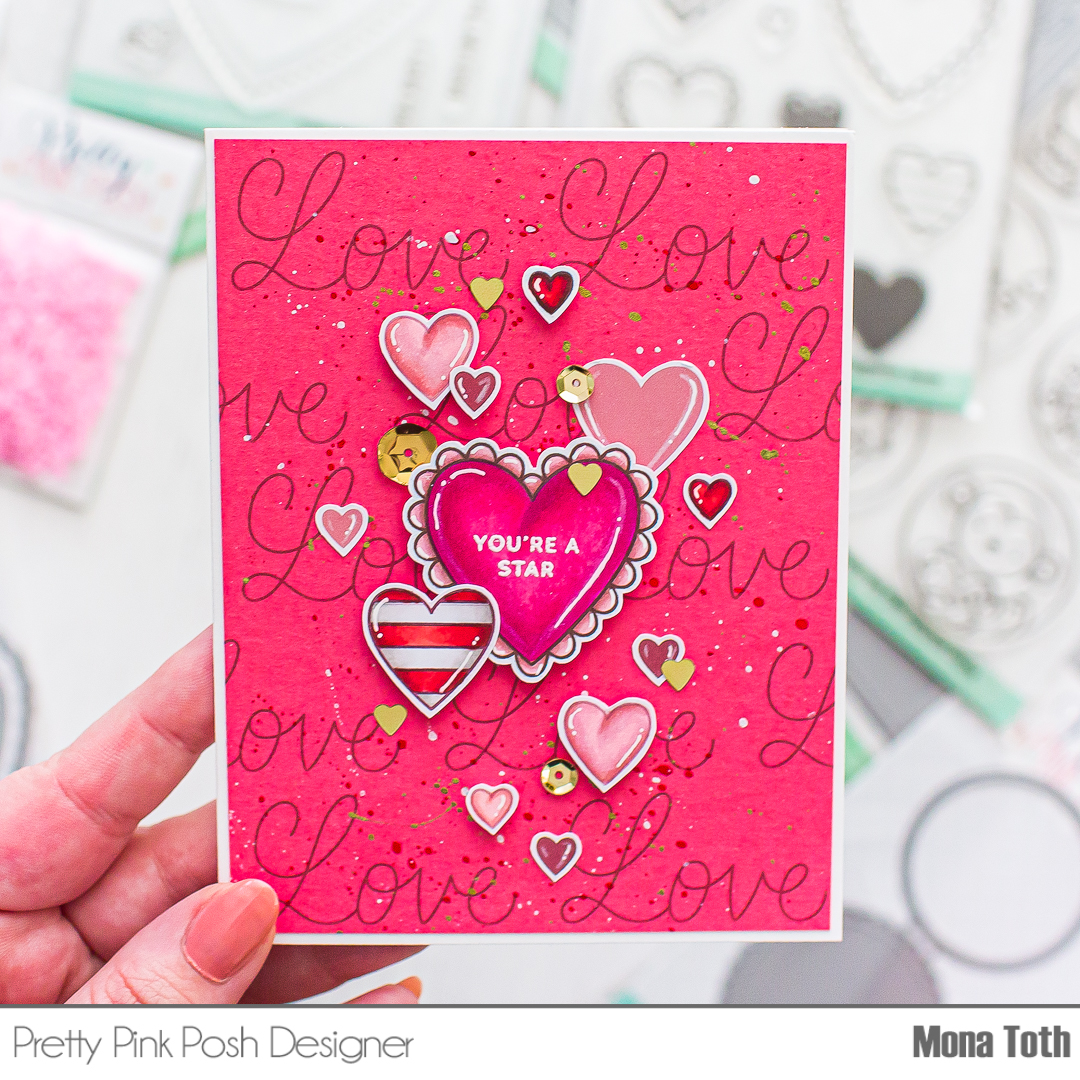
When it was done, I put my card together with 3d FoamSquares to add a little dimension to my card. In the end I embellished the card with Gold Sequins, and it was ready. Thank you so much for stopping by, see you next time. Hugs, Mona.


Hurry, today is the LAST day to save 15% on all Valentine items!


Using affiliate links does not mean additional costs for you. I really appreciate your support. I am using only products I LOVE. If you buy supplies through my affiliate links, you support my channel and blog with a small commission and when you shop through my links I will do a happy dance. Affiliate Disclaimer.

[VIDEO] Pastel Slimline Card Tutorial

Hello lovelies, I am back with another coloring video tutorial. Today I am going to show you how I created this sweet pastel slimline card with cats and melons. You can find the video here


THIS CARD FEATURES

  • Purrfect Day Stamps HFF | SBC | SSS ]
  • Treat Yo'Self Clear Stamps HFF | SSS ]
  • Stitched Slimline Trio Dies HFF | SBC | SSS ]
  • Slimline Pull Tab Dies HFF | SBC | SSS ]
  • For the additional supplies visit the thumbnails below this post.


    Do you enjoy this inspiration? I really appreciate if you pin this photo to your Pinterest.


VIDEO TUTORIAL

Watch my video tutorial below to learn how I created this slimline card as well as how I colored these cute cats. If you have any questions feel free to ask in a comment.


Watch the video above | Watch the video in HD on YouTube


CARD INSTRUCTIONS

For this project I will use these cute cat images from the Purrfect day stamp set as well as this melon image from Treat Yo’self. I think it’s so much fun to mix animal stamps with fruit images. I stamped the images with lighter brown, alcohol marker friendly inkpad called Gingerbread. I used this color because I wanted to achieve a softer look for the images.

For the coloring I have used Spectrum Noir Illustrator Markers, but you can make it with any other marker as well. For the coloring and the full process be sure to check out the video tutorial here. Spectrum Noir Illustrator Markers Used: GT3, GT2, GT1, MG3, MG2, MG1, PP2, FS1, TN3, TN1, FS6, Blender. Once the coloring was done, I added highlights with white pencil and white pigment pen. Once it was done, I run the images through my mini die-cutting machine with their coordinating dies.

I have also prepared slimline die-cuts with the Stitched Slimline Trio Dies and Slimline Pull Tab Dies in different cardstock colors. For the background I made a quick ink blending with Du-si-do Pink inkpad from Catherine Pooler as well as with Spun Sugar distress oxide ink. Next, I splattered on it with clear water and white watercolor as well, and let it air dry.

After this I stamped the have a purrfect day sentiment from the “Purrfect day” stamp set with watermark ink to the pastel peach die-cut, then I heat embossed with white embossing powder. I have also created four die-cuts with the Hello word die from white cardstock. I adhered them together for more depth and now I have everything prepared to finish my card. Thank you so much for stopping by, have an amazing day, Mona


USED SUPPLIES

Using affiliate links does not mean additional costs for you. I really appreciate your support. I am using only products I LOVE. If you buy supplies through my affiliate links, you support my channel and blog with a small commission and when you shop through my links I will do a happy dance. Affiliate Disclaimer.

Pretty Pink Posh | Rainbow Birthday Card | Birthday Blog Hop + GIVEAWAY


Hi crafty friends! Welcome to day 3 of the Pretty Pink Posh Birthday Celebrations Blog Hop! I made this cute birthday card with the super cute Party Days Stamp Set. But there are lots of amazing new sets in this release, I am showing you some of my favorites, in this post too. 

Do you enjoy this post? I really appreciate if you pin this photo to your Pinterest.

CARD INSPIRATION

When I saw this adorable stamp I knew that I will use it in a different way. For my card I stamped the images from the Party Days Stamp Set to Neenah Solar White Cardstock


After a quick heat set I colored the images with Spectrum Noir Illustrator markers in rainbow order. I have used the following colors: OR2, BO3, BO1, CT1, CT3, CT4, GY3, CG1, AG1, AG2, AG3, GT1, GT2, GT3, IB1, IB2, IB3, TB3, TB4, PV4, PV3, PL1, PV1, BP5, BP3, BP2, BP1, FS3, TN3, TN4, MB1, MB2, MB3, MB4, GB5, EB1, EB2, EB4, EB6. 


After the coloring, I made a quick fussy cutting, because I wanted to show you, that there is other was to use this beautiful set. 


When it was done, I made a quick ink blending and created the background with distress oxide inks. You can find the used supplies below the post. 


When the ink blending was done, I stamped with watermark ink and heat embossed the celebrate sentiment with white embossing powder on a light brown cardstock. I also made on it a quick ink blending too and put my card together. Finally I added finishing touches with white pen.

I am absolutely in love with this Valentine Hearts Stamp Set as well. That "LOVE" scripty sentiment totally get me with it's coordinating die. You can also see a sneaky peek of my next card on this photo below.

I also love these Sweetheart rhinestones. Amazing and versatile release, let me know in your comment what is your personal favorite.

BLOG HOP

Below is a list of all of the designers participating in today’s blog hop! Check out all of the wonderful inspiration!


Pretty Pink Posh blog 

Mona Toth - You are here


GIVEAWAY 


Pretty Pink Posh will be giving away 6 $25 gift certificates during the three-day blog hop celebration! Comments must be left by 11:50PM , January 15th 2021. The winners will be announced on the Pretty Pink Posh Blog


Thank you so much for stopping by, don’t forget to check this beautiful release, enjoy the hop. Hugs, Mona.

USED SUPPLIES


Using affiliate links does not mean additional costs for you. I really appreciate your support. I am using only products I LOVE. If you buy supplies through my affiliate links, you support my channel and blog with a small commission and when you shop through my links I will do a happy dance. Affiliate Disclaimer.

[VIDEO] Lovely Winter Scene Card with Lawn Fawn


Dreams come true crafty friends! I am thrilled to share a secret I kept until now, I am a new Lawn Fawn Blog Contributor. I still can’t believe it, but I can’t wait to share more projects with you! For today I have created this cute wintery scene card for Lawn Fawn with video tutorial 


For this card I have used these adorable squirrels from the Let’s go nut’s stamp set, as well as this tiny heart stamp from the One in a Chameleon stamp set. I have also used my current favorite dies as well. For the used supplies feel free to check the supply list in the description box below


VIDEO TUTORIAL


For the full process and the coloring part check my video tutorial here. For the coloring I have used the following Spectrum Noir Illustrator markers: BP6, BP4, BP2, BP1, MG4, MG2, MG1, TB1, TB2, TN7, TN5, TN3, MG1, MB2, MB3, MB4, EB4, FS6, GB6, GB9, GB11, Blender. 


USED SUPPLIES


Using affiliate links does not mean additional cost for you. I really appreciate your support. I am using products only I LOVE. If you buy supplies through my affiliate links, you support my channel and blog with a small commission and when you shop through my links I will do a happy dance. Affiliate Disclaimer.

Pretty Pink Posh Design Team Announcement

Hi crafty friend! I am super excited to announce that I have joined the Pretty Pink Posh video team! 😍 Be sure to check out their blog, because they announced their new team today on the PPP blog and there is a 100 dollar gift certificate giveaway too, so head there for a chance to win!


To celebrate with Pretty Pink Posh, I made this cute winter themed card with the Bunny FriendsWinter Woodland and Hummingbird Thanks stamp sets. I have also created a quick Reel video on Instagram, feel free to check it out how I created it. 😊


I stamped the images to Neenah Solar White Cardstock. To the background I stamped the branch image multiple times and I did a really basic coloring on it, because I knew I will cover it with a piece of vellum for a foggy soft look. 


I have also colored bunnies and cute birds from the Bunny FriendsWinter Woodland stamp sets. For the Coloring I have used the following Spectrum Noir Illustrator markers: FS6, FS9, TN1, TN2, TN3, TN4, GB4, GB6, GB9, GB11, GT3, AG4, AG3, AG2, AG1, PP3, PP1, OR2, DR3, CR6, CR10.


After the coloring I put adhesive over the colored parts and when it dried I made an ink blending over it with Blueprint Sketch, Peacock Feathers and Speckled Egg Distress Oxide Colors and wiped with a dry cloth. (Used Supplies below the post)


I stamped the sentiment from the Hummingbird Thanks stamp set with watermark ink to a 5.25" x 4" Vellum, then I heat embossed the sentiment with white embossing powder and heat gun.


In the end I added white dots and highlights with white pencil and pen. Thank you so much for stopping by, see you next time! I can't wait to share my inspirations with you. Don't forget to check the giveaway on the PPP blog

Hugs, Mona.

USED SUPPLIES

Using affiliate links does not mean additional cost for you. I really appreciate your support. I am using products only I LOVE. If you buy supplies through my affiliate links, you support my channel and blog with a small commission and when you shop through my links I will do a happy dance. Affiliate Disclaimer.

Lawn Fawnatics Challenge 91 - New Year


Happy happy new year crafty friends! 🦄 Wishing you good health, happiness, success and lots of crafty time! Thank you, thank you for all your amazing support and love in the past year. It means the world to me!


I have created this card tonight for the current Lawn Fawnatics challenge 91 - where the topic is the new year. As always you can find the used supplies below the post.


I wanted to create a simple but colorful card so I decided to create a pastel rainbow ink blending in the background, I did exactly the same blending like in my Yeti video here


Then I created a shaker part with the Outside in stitched mug die, to the center of my card which I backed with mermaid cardstock (this is my all time favorite soft turquoise cardstock).


Next I stamped these sweet images from the unicorn picnic stamp and colored with Spectrum Noir Illustrator markers. I have used: FS9, FS6, FS8, FS1, PP2, BP1, PP4, HB1, HB2, HB3, AB1, AB2, AB3. When the coloring was done I added white highlights with white pen.


When it was done I created the "have a Sweet New Year" sentiment with die-cutting and heat embossing. In the end I put together my card. Thank you so much for stopping by, see you next time! 

Big hugs, 
Mona

USED SUPPLIES